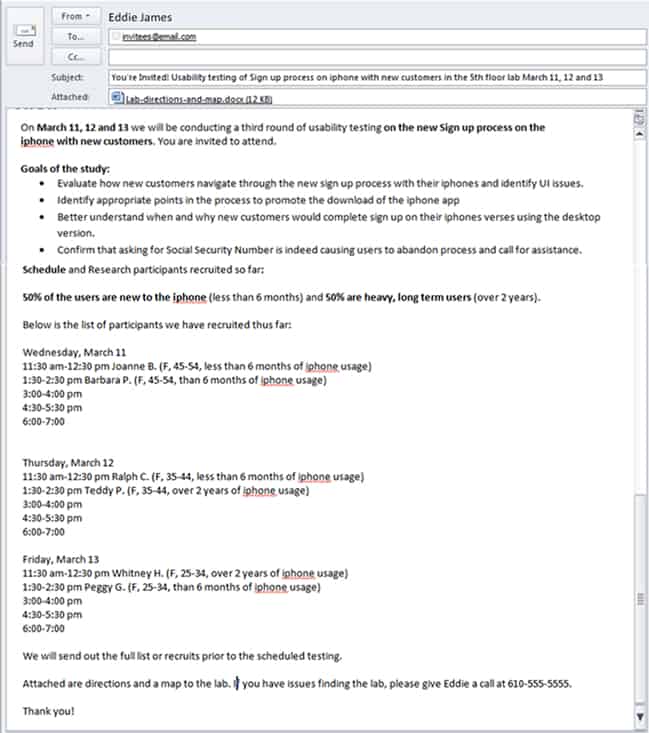
Sending out invitations for observing usability test sessions sounds easy. But to potential observers of your sessions, there are a lot of details they have to process in order to decide to add sessions to their over-crowded calendars. Here are 14 tips and considerations for designing better, more inviting email invitations for your usability sessions.
1. Write a great subject line
Make your subject line clear and direct. It should include the type of research (card sort, usability testing, etc), the project name or scope of research, some information about the research participants, and the dates of the research.
2. Include an image
Including a sample screenshot from the study helps recipients quickly understand what’s being tested. An image can also illustrate visual concepts or wireframes that certain recipients may not have seen before.
3. Clearly state the study goals & scope
Not all people being invited to observe are intimately familiar with the project being tested. They may not even know the formal project name or call it something entirely different. So be brief yet detailed in this section and avoid jargon. The description should also include a list of your participant recruiting criteria.
4. List the time slots & any scheduled participants
Along with the start and end times of each session, list out the participants you have recruited so far and some general demographics. Listing out the names of the participants helps make the sessions less like a meeting with the usability team and more like having an appointment with a real person.
5. Include maps and directions
Always provide a map and clear directions to the testing location. This is even important if the test lab and observers are in the same building. A map will allow new people who have never attended a session to find you with ease.
6. Include a phone number just in case
It’s a good idea to include a cell phone number just in case an observer gets lost. It happens more than you think.
7. Include information on what to expect
Depending on who you are inviting, you might want to include a brief paragraph about what observers can expect when attending. This may be the first time the observer has watched this type of research so setting some expectations can be very helpful. Questions potential observers could have: Will they get to ask questions? Are laptops and ipads allowed? Is chatting and talking allowed? How many sessions can they attend? Is internet available in the observation room? How many observers can fit in the observation room? You might want to consider consolidating all this information in an observers’ guide that you can attach to all invitations.

8. Explain how to RSVP or if it’s needed
Should observers RSVP to each session they are interested in? How do they do it? Is there a calendar? Is this just an email? Who do they send the email to? Is there a cut off of when the have to RSVP?
9. Send out Remote viewing URLs
If you are streaming your sessions to remote viewers, be sure to schedule remote viewing early and include the links in the invitation.
10. Encourage certain observers to attend certain sessions
If you have an important stakeholder who is particularly interested in a certain type of user, make sure that stakeholder knows which sessions are best for him/her to attend. You might even consider sending important stakeholders special invitations tailored to their needs or interests.
11. Allow time slot booking via email invitation
It’s nice to send one email that allows the user to pick the sessions they want and easily add them to their calendar. You can learn how with this tutorial entitled “How to Create a Pick-a-Meeting Request”. You can also send out individual invitations for each session, but that means each observer gets 10 invitations that basically say the same thing, which can be difficult for the observer to keep track of.
12. Consider allowing recipient to invite others
Often a client or stakeholder will delegate observing sessions or forward to other teams. Is this okay? It’s good to encourage or discourage this in your invitations.
13. Give plenty of notice
Sending out an invitation right before a study is fine, but to get a good in-person turnout for your study, it’s best to send the invitation at least a week ahead of time – two weeks or more if possible.
14. Send a confirmation 1 or 2 days before testing begins
Confirming reminds observers that the sessions are coming up and gives you an opportunity to send out any changes that may have occurred since your original invitation was sent.
Want to learn more?
If you’d like to…
- get an industry-recognized Course Certificate in Usability Testing
- advance your career
- learn all the details of Usability Testing
- get easy-to-use templates
- learn how to properly quantify the usability of a system/service/product/app/etc
- learn how to communicate the result to your management
… then consider taking the online course Conducting Usability Testing.
If, on the other hand, you want to brush up on the basics of UX and Usability, then consider to take the online course on User Experience. Good luck on your learning journey!
(Lead image: Depositphotos)
