
Requirements are statements about an intended system that specify what it should do and how to do it. In Part 1 of this article we have seen the difference between the two types of system requirements – functional and non-functional requirements. The article then proposed a 3-step approach which you can use in order to conduct requirements gathering with good user experience in mind. Now that Step 1 has been explained as “Gather data from the users“, we pick up where we have left and proceed to discuss Steps 2 and 3.
Step 2: Analyze Data To Understand User Needs
Although it is dependent on the techniques you have used for gathering user data, more often than not, you will have a large volume of data to analyse. At this stage, I would suggest using statistical techniques in order to group data into more manageable chunks. Such chunks would be easier to analyse and hence extract from them certain traits.
It is recommended that this step is then sub-divided into 4 sub-steps. Each sub-step is a more detailed view of the previous step:
2.1 User Groups
Using the data that you have gathered, you can start building your user groups. As the name implies, user groups are groups of users who share similar characteristics. They are not specific users. These characteristics typically fall into 3 categories:
- Personal: e.g. age range, gender and capacities
- Academic: e.g. education, certification and computer experience
- Attitudes: Attitudes towards the job and the task
The best way to represent user groups is using a grid as shown below. The actual characteristics in the grid can be added or removed, depending on how much you think that they are beneficial to identify a user group.
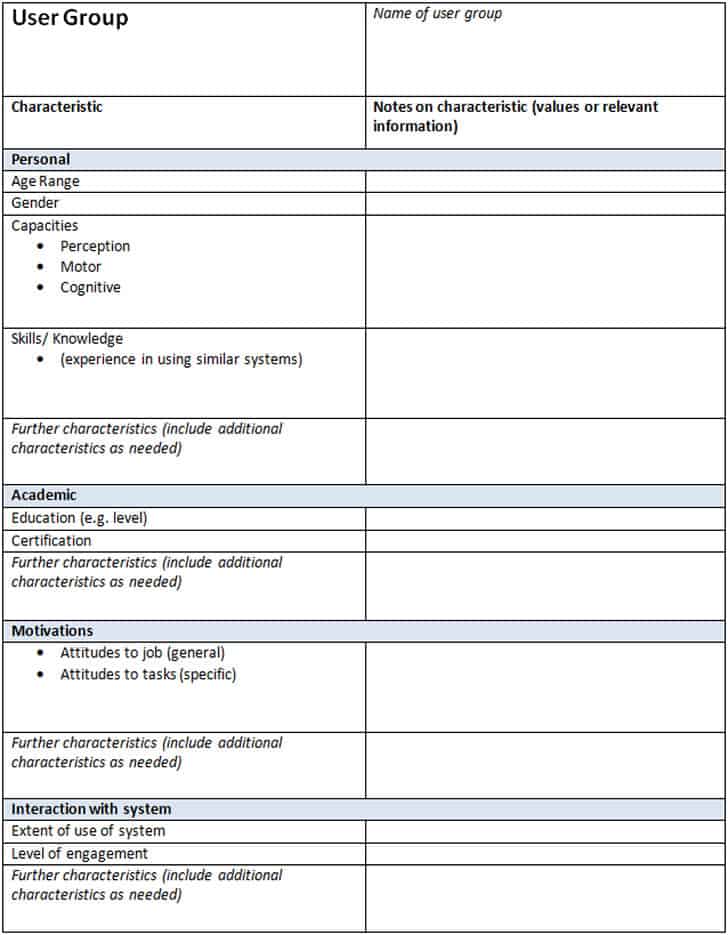
Interestingly enough, the second column already helps in shedding some light on the requirement that the system must have in order to cater for the needs of entire user groups. For example if the visual capacities of your user group is typically 3% less than what normal users see (because of the age within the user group), then the requirement would be that the system needs to have large fonts and high contrast. Had the visual capacity been a range from 0% loss to 3% loss, then the requirement would have been that the system must have a facility to increase the font size and the contrast.
2.2 Personas
Invented by Cooper in 1994, personas are fictitious users that act as stand-ins for real users in order to identify their motivations, expectations and goals that drive their online behaviour. There are several advantages of using personas. First of all, they inspire lateral thought and exploration when building them.
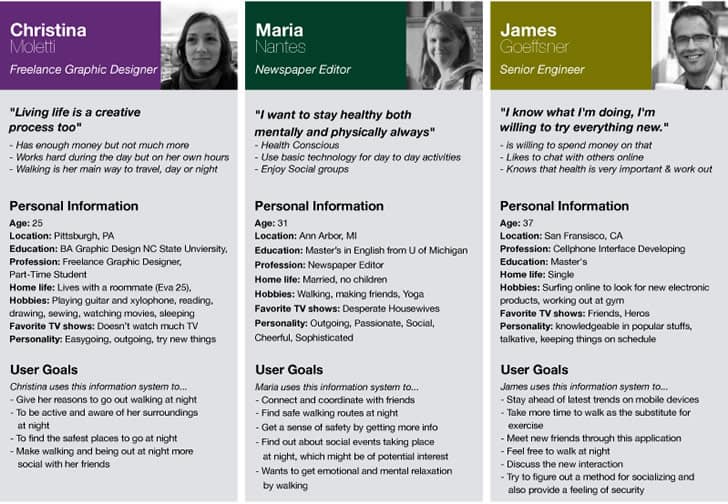
For example imagine you have stated in your user group that your users typically hold managerial and executive roles. When creating the persona of Mr. Bob, you would think about what type of car Mr. Bob drives and what hobbies he might have. In its role of specifying a user that falls within a user group, personas help in filling in holes that were previously unexplored. In addition to this, personas are less abstract and hence easier to use for communication purposes. They are also more manageable than thinking about an entire user group. Finally, and most importantly, personas will help you develop a system that users need (to help them achieve their goals) rather than developing a system that the users want.
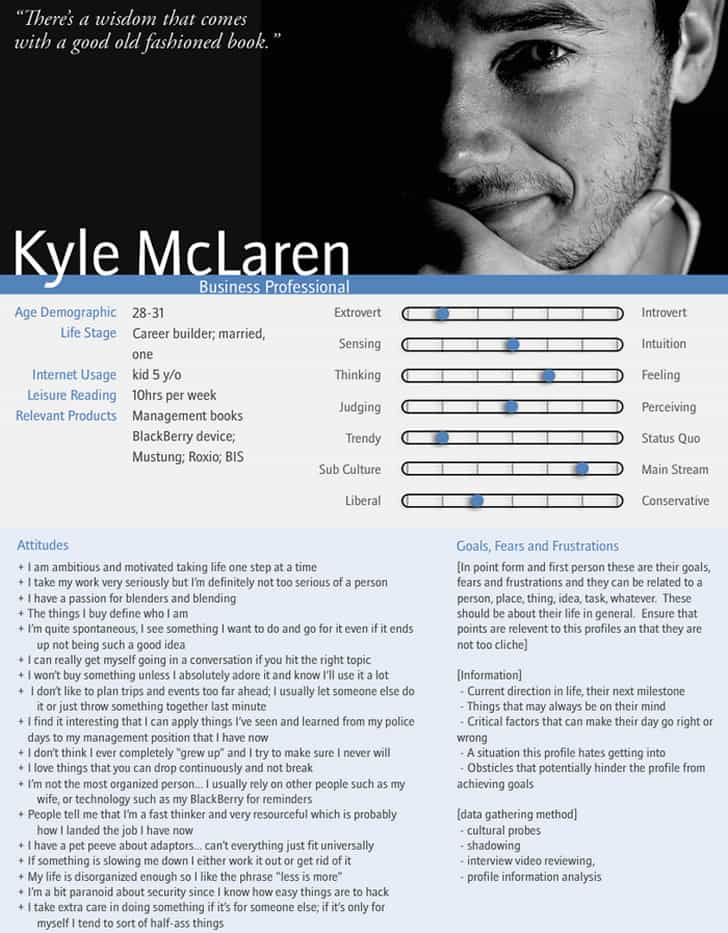
While there is no strict framework for personas, at their very minimum they should contain:
- A name
- A photo
- Demographics (age, sex, etc.)
- A descriptive paragraph
- Needs, goals and features
Other pieces of information that one may include are: a quote from the persona, frustrations, ideal features, need to know and behaviors.
2.3 Scenarios
Once you have developed your persona, place him or her in a scenario. A scenario is a narrative which describes how a user might interact with your system. Since there are several tasks that a user will undertake when interacting with your website or system, it is advisable to list those tasks and then create a scenario for each. In this way the scenarios would be more specific and more manageable.
Suppose that you have an e-commerce website from which you sell mobile phones and in Step 2 you have created a persona called Bob who is a 19-year old student who likes gadgets and would like to buy a phone but is on a tight budget etc. etc. In the scenario, you will put Bob in several “stories” based on the objectives that he would like to achieve when using your website. So, you might create a scenario in which Bob wants to achieve these objectives:
- Searching for a mobile phone for his budget
- Comparing the features of two different mobile phones
- Purchasing a mobile phone
The following are some examples of scenarios:
Scenario Example 1 – A customer withdrawing money from an automated teller machine (ATM): It’s Friday afternoon and Joe is flying to Sydney. He doesn’t have enough money for a taxi to the airport, and he’s running late. He goes to the local ATM and identifies himself. He specifies that he wants $100 from his savings account. He’d like the money in $20 notes so that he can give the taxi driver the correct change. He doesn’t want a printed receipt, as he doesn’t bother keeping track of transactions in this account. (Source: Infodesign.com)
Scenario Example 2 – Changing an employee’s job title: Hanna Reed-Smith, Human Resources Specialist, receives an email request to change Josh Anderson’s job title from Personal Lines Analyst to Personal Lines Manager.
Action: She opens HRWeb and clicks on Search for Employee. Hanna then uses the task bar buttons to get back to her e-mail to get Josh’s employee number from his e-mail message. She uses the mouse to highlight the number, copy it, go back to hr Web, paste the number in the Employee ID field, and activate the Search button. She clicks on Employment Information. (Source: UI Access.com)
2.4 Task Analysis
The next step is to use each scenario to list the tasks that the user needs to perform in each. There are various techniques that one can use. My personal favourite is Hierarchical Task Analysis (HTA). UX Matters defines Hierarchical Task Analysis as a structured, objective approach to describing users’ performance of tasks, hierarchical task analysis originated in human factors. The advantages of using hierarchical task analysis is that it facilitates the:
- Comparison of different approaches for achieving the same objectives
- Understanding of how a system works
- Reusability of user experience design
There are 2 ways to represent Hierarchical Task Analysis – graphically or in text:
Graphical Example: The example below is a Hierarchical Task Analysis graphical representation of vacuum cleaning
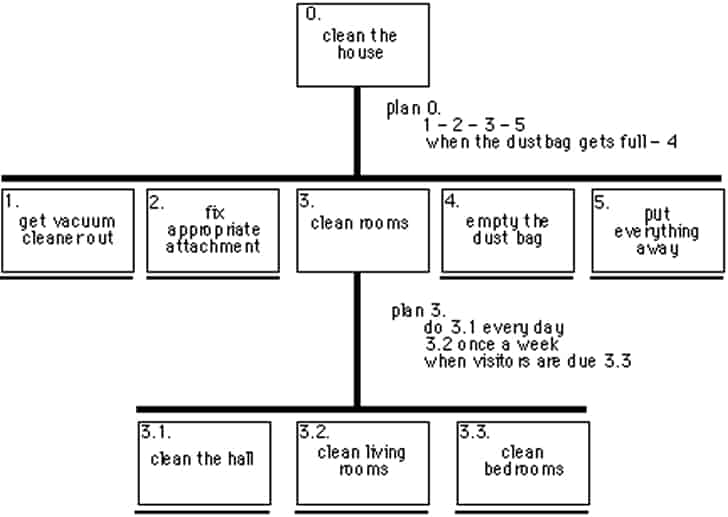
Textual Example: The above example can be represented using plain text as follows
- 0 Clean the house
- 1 Get vacuum cleaner out
- 2 Fix appropriate attachment
- 3 Clean rooms
- 3.1 Clean the hall
- 3.2 Clean living rooms
- 3.3 Clean bedrooms
- 4 Empty the dust bag
- 5 Put everything away
- Plan 0. 1 – 2 – 3 – 5. When the dustbag gets full do 4
- Plan 3. Do 3.1 every day 3.2 once a week when visitors are due do 3.3
Step 3: Convert User Needs Into Requirements
If the above steps have been completed well, then eliciting the requirements from the Hierarchical Task analysis is pretty straightforward. First make a list of functional and non-functional requirements.
For example let us imagine that we are designing a e-commerce website that sells books. In Step 2.1 we would determine that one of the user groups would be students who would look up academic books. In Step 2.2 we would create Tom Smith – an 18 year old student currently undertaking a degree in Human Computer Interaction. In Step 2.3 we would create a scenario whereby Tom is using our website to look up a specific HCI book. Therefore, in Step 2.4 we would create a Hierarchical Task Analysis that Tom goes through in order to search for a book using our website. Notice how each step is a detailed view of its predecessor. In this step, we take each task and state the functional and non-functional requirements that are required by the system to make it possible for the user to perform that task. To search for a book, Tom would need a search function (which is a functional requirement).
Then, for each requirement in each list use a grid similar to the one below. Thus, the search function can be represented as follows:
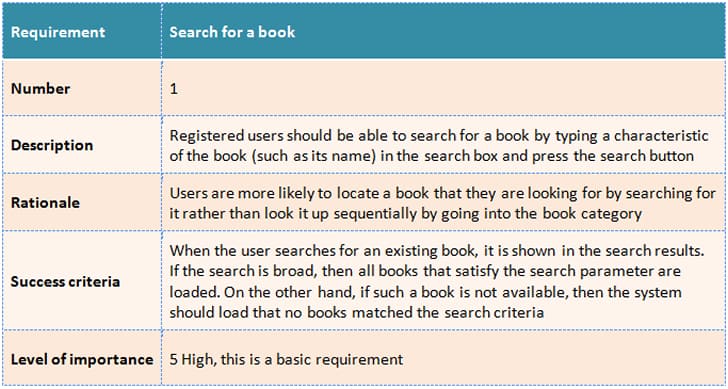
Using the above grid layout, one can define each requirement using these labels:
- Requirement: The name of the requirement
- Number: A unique number that identifies the requirement. Ideal for communication purposes
- Description: A short description of the requirement
- Rationale: The reason why this requirement is needed
- Success criteria: What determines that this requirement has been well implemented
- Level of importance: The importance of this requirement for prioritization purposes. Usually a number between 1 and 5
This step is performed for each task until you have a list of functional and non-functional requirements for the entire system.
Conclusion
As you have probably realized from this article, requirements gathering is quite a lengthy and detailed process. Needless to say, the larger the system, the more complex the process is. However, the requirement gathering steps that have been proposed alleviate these problems by helping you think about the requirements in terms of creating a good user experience.
The advantage is that this process will help you gather most requirements in the pre-design stage, define and prioritize them, avoid duplication and set criteria that measure the degree to which they have been implemented. This will inevitably save you considerable time and money that would otherwise end up being wasted on re-work.
Want to learn more?
If you’d like to improve your skills in User Research, then consider to take the online course User Research – Methods and Best Practices. Alternatively, there is an entire course on Usability Testing which includes templates you can use in your own projects. Lastly, if you want to brush up on the basics of UX and Usability, you might take the online course on User Experience. Good luck on your learning journey!
(Lead image: Depositphotos)
